Pix4DMapper and Data Processing Notes
For this class we have used Pix4DMapper for the majority of our data processing.
(Figure 53: The home page for Pix4D)
Use CORS maps on ngs.noaa.gov website to get GPS L1 and L2 and our GLO. This website then sends us the correct files that are needed for our data processing. This also sends us an Antenna Reference Point and coordinate location.
(Figure 54: CORS website needed for gathering files needed for data processing.)
You also have to use the system that you used to plan the flight and fly the flight, so in this instance the C-Astral application. In this application there is a post processing section where you must upload your rover log and set a fixed point for the data. you then add the G,N, and O files into the application as well, and check options before completing post processing.
The CORS website also has NGS data sheets with known coordinate benchmarks. If we were not within 7 miles of a core station, we would need to establish our own fix location for every flight. Using these known benchmarks makes it faster and easier to establish our location. There are other ways to get the correct location files but it takes hours or even days to get the information.
After getting the files and information that is necessary for processing, we open Pix4DMapper and upload it. You first want to open your images folder and go through all of them to ensure you only have the images you want for processing.
(Figure 55: Images from the mission flown shown in folder.)
When creating a new project make sure to go to your GCP folder, and save it as a text file for later use. When in Pix4D you save the project name, choose a folder to where you want to save the processed data, and continue to upload the images you have gotten from the flight. Pix4D will automatically check to see if the images are geotagged or not.
The image properties settings in Pix4D are usually correct but do a quick skim to make sure they are correct. The next thing you need to do is set up the Output Coordinate System. On this page you can set up your known coordinate system, which we upload, and then continue on to the processing options template. From these templates you can optimize your project to get the output data you desire.
After finishing optimization for your project Pix4D will show you the data that is has so far, and you can look at all the images you are about to process again. In the bottom left you can see there are 3 processing options you can choose from, including initial processing, point cloud and mesh, and DSM or orthomosaic and Index.You can then go into processing options to optimize your processing even more. There are plenty of cool things you can choose to do within these options like checking GeoTIFF to make a Raster DTM. There are many other additional outputs that you can choose from in these options.
(Figure 56: The Pix4D application after narrowing down what photos need to be processed.)
After setting the options to your liking, you use the project tab to get to your GCP/MTP Manager. You need to ensure the GCP Coordinate System's Datum is set to where you want it, and then import your GCPS as the text file we made earlier.
(Figure 57: GCP and MTP Manager, where you upload your GCP as a text file.)
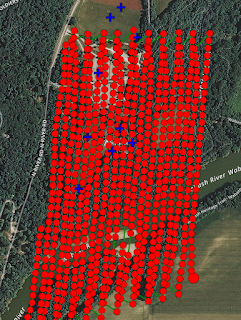
Now that your GCPS are uploaded you can see them in the data you have so far, marked by a blue plus symbol.
(Figure 58: The map after uploading GCP's and customizing options, ready to process!)
It is now time to process! Click start and wait for your data to process!


